Models and SQL Databases
Databases are key to saving persistent (long-term) data in an application. We will save all contacts that submit the form to a SQL Database, where records are identified by a primary key (usually called id) and can have any number of column values. You can think of it a little bit like a spreadsheet.
We will use a SQLite file database to store our data.
If anything with your database goes wrong in development or you change your data models, you can simply delete your database file. Note that your server must be stopped while you delete your database file.
In the MVC pattern, models represent data. Beego has a built-in Object-Relational Mapper (ORM), where a Go struct (model) can match what is in a database table. This abstracts away any SQL that we would potentially need to write for now; we will learn to use SQL in a different unit. If you are interested, check out w3schools for some examples on how SQL works.
models/default.go
package models

import (
	"log"

	"github.com/beego/beego/v2/adapter/orm"
	_ "github.com/mattn/go-sqlite3"
)

type ContactModel struct {
	Id      uint64 `orm:"auto"`        // this automatically creates an integer primary key
	Name    string `orm:"size(100)"`   // 100 characters max
	Email   string `orm:"size(255)"`   // 255 characters max
	Message string `form:"type(text)"` // any size string
}

var O orm.Ormer

func InitDB() {
	orm.RegisterDriver("sqlite3", orm.DRSqlite)
	orm.RegisterDataBase("default", "sqlite3", "./queenbee.db")
	// this function can take a list, e.g. orm.RegisterModel(new(M1), new(M2), ...)
	orm.RegisterModel(new(ContactModel))
	O = orm.NewOrm()

	err := orm.RunSyncdb("default", false, true)
	if err != nil {
		log.Fatalf("Failed to sync database: %v", err)
	}
}
main.go
package main

import (
	"queenbee/models"
	_ "queenbee/routers"

	beego "github.com/beego/beego/v2/server/web"
)

func main() {
	models.InitDB()
	beego.Run()
}
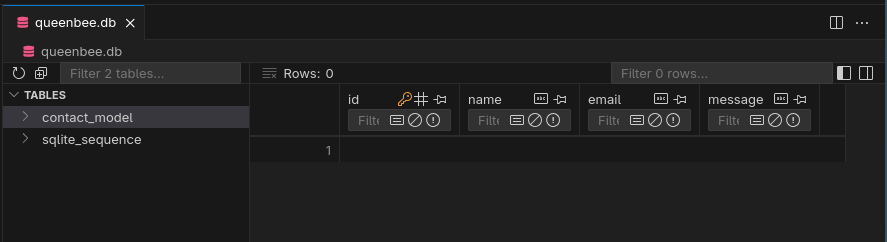
View Your Database
Our database is saved in a file called queenbee.db. To access your SQL database with a GUI, you can use a VSCode extension like SQLite Viewer or an application like DB Browser for SQLite. Viewing the SQL database looks something like this, where you have a table called contact_model with no rows (yet).
Save Contact to Database
We can edit the POST handler on our controller to save to the database.
func (c *ContactController) Post() {
	c.Data["Title"] = "Contact"
	c.Data["Result"] = "Thank you for your submission!"
	c.TplName = "contact.tpl"

	contact := Contact{}
	err := c.Ctx.BindForm(&contact)
	if err != nil {
		c.Data["Result"] = "ERROR: " + err.Error()
	} else if contact.Message == "" || contact.Name == "" || contact.Email == "" {
		c.Data["Result"] = "ERROR: Please enter all values."
	} else {
		err = sendEmail(contact)
		if err != nil {
			c.Data["Result"] = "ERROR: Could not send email. " + err.Error()
		} else {
			c.Data["Result"] = "Email sent successfully!"
		}
		log.Default().Println(contact)
		// NEW: Save to database
		contactDb := models.ContactModel{
			Name:    contact.Name,
			Email:   contact.Email,
			Message: contact.Message,
		}
		_, err := models.O.Insert(&contactDb)
		if err != nil {
			c.Data["Result"] = "ERROR: Could not save to database. " + err.Error()
		} else {
			c.Data["Result"] = "Contact form received!"
		}
	}
}
Once you submit your contact form again, you should see an entry created in the database.
